At Outfunnel, we believe sales and marketing work best when they work together — and connecting sales and marketing data is the smartest place to start. While Outfunnel already helps you capture lead sources and UTM codes for new web leads, sometimes you want to take things further — connecting your CRM data with Google Ads and Google Analytics for deeper analysis and more precise campaign management.
We’ve done this at Outfunnel and I’m sharing our setup as a guide below.
Most guides about connecting Pipedrive to Google Analytics 4 or Google Ads barely go beyond the basics. They skip crucial steps and leave you guessing about the complete setup. This guide will walk you through the complete process: setting up custom fields and automations in Pipedrive, then using Zapier to send conversion events (including revenue data) to GA4 and Google Ads.
What’s in this article?
- Set up Pipedrive
- Connect Pipedrive to Google Analytics 4 with Zapier
- Connect Pipedrive to Google Ads with Zapier
Before you start
Your lead forms need to capture the GA Client ID and the GCLID at signup or during form submits. Most WordPress form builders support hidden fields for passing this data, but capturing it requires custom development. Use JavaScript to read these identifiers on the page and populate the hidden fields before submission. You will use the GA Client ID for your Pipedrive Google Analytics integration and the GCLID for attributing Google Ads conversions. This guide assumes you are already collecting both identifiers. If you are interested, we can share the JavaScript snippet we use and make our solution public.
You likely already have a workflow that sends website leads into Pipedrive, often through tools like Zapier or Make. Note that Outfunnel’s lead form integrations create a lead in Pipedrive without opening a deal. In this flow we use Zapier to convert each signup into a Pipedrive deal, and you can achieve the same result with Pipedrive automation if you prefer. This is important because this guide relies on Deals to send conversions to GA4 and Google Ads as the deal moves through different pipeline stages.
Set up Pipedrive
Start by setting up the fields you’ll use for automations and filters. We will be creating these fields under the Lead/Deal. You need two essential properties: “GA client ID” and “GA Click ID” for storing GA4 visitor and Google Ads click identifiers that I mentioned in the beginning. Navigate to your Pipedrive settings (https://your-company-slug.pipedrive.com/settings/fields) and add them as text fields if you don’t already have them. You can also use Person or Organization fields, but you would need to adapt the field references mentioned in this article accordingly.
Create stage flags using deal fields
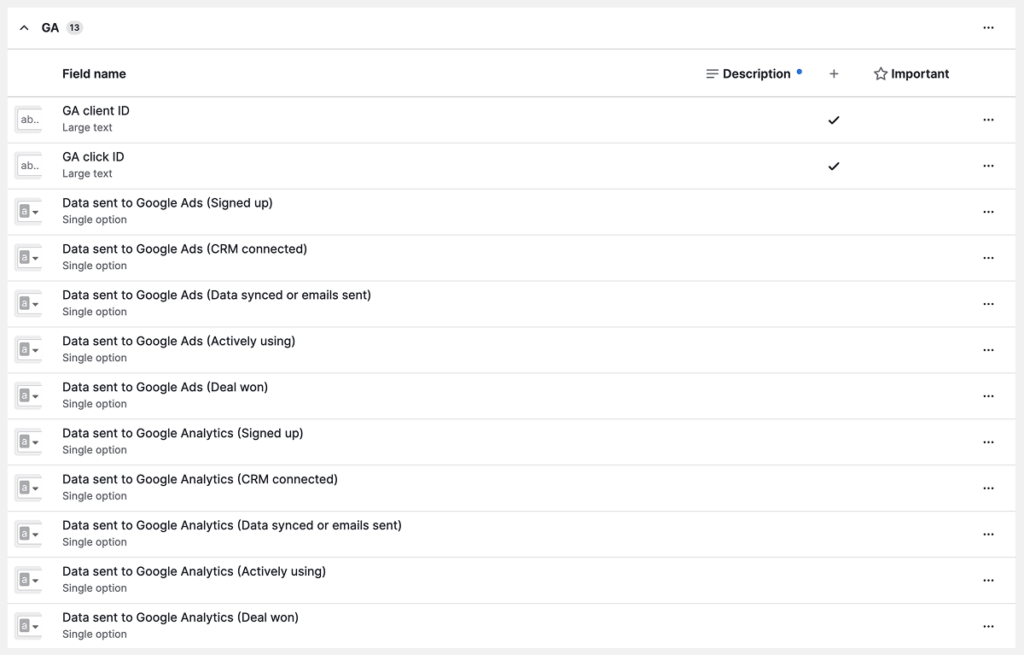
Set up additional fields for each deal stage – we will use them for flagging the status of conversion events. Create the fields using the “Single Option” field type and add two options: “true” and “false”. These fields tell your automations and triggers when to take action.
At Outfunnel, we are using the following setup for the field namings:
- Data sent to Google Analytics (Signed up)
- Data sent to Google Analytics (CRM connected)
- Data sent to Google Analytics (Data synced or emails sent)
- Data sent to Google Analytics (Actively using)
- Data sent to Google Analytics (Deal won)
Each named after its corresponding deal stage. We have created separate fields for both Google Ads and Google Analytics because we send offline conversions to both Google Ads and events to GA4. We will be using Signed up and Deal won as examples in this article.
Create deal filters for Zapier triggers
Deal filters will trigger your Zaps. Compared with using stage-change triggers, this approach ensures your automations finish before Zapier activates, preventing missed or duplicate triggers.
Go to your main pipeline (https://your-company-slug.pipedrive.com/pipeline). Click the “Filter” button in the top right corner, then select “Add a new filter” at the bottom.
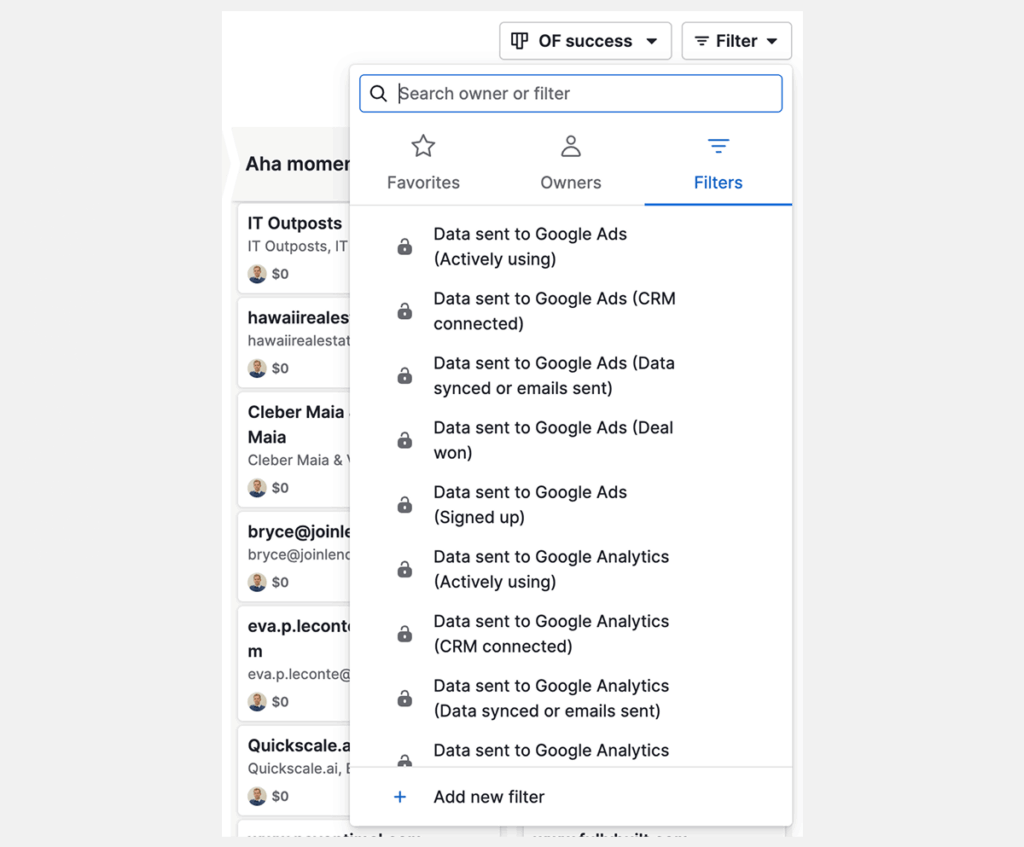
A modal window will appear. Select one of the deal fields you just created and set the condition to “false”. Name the filter after the property name to avoid confusion later. Repeat this process for each field you created.
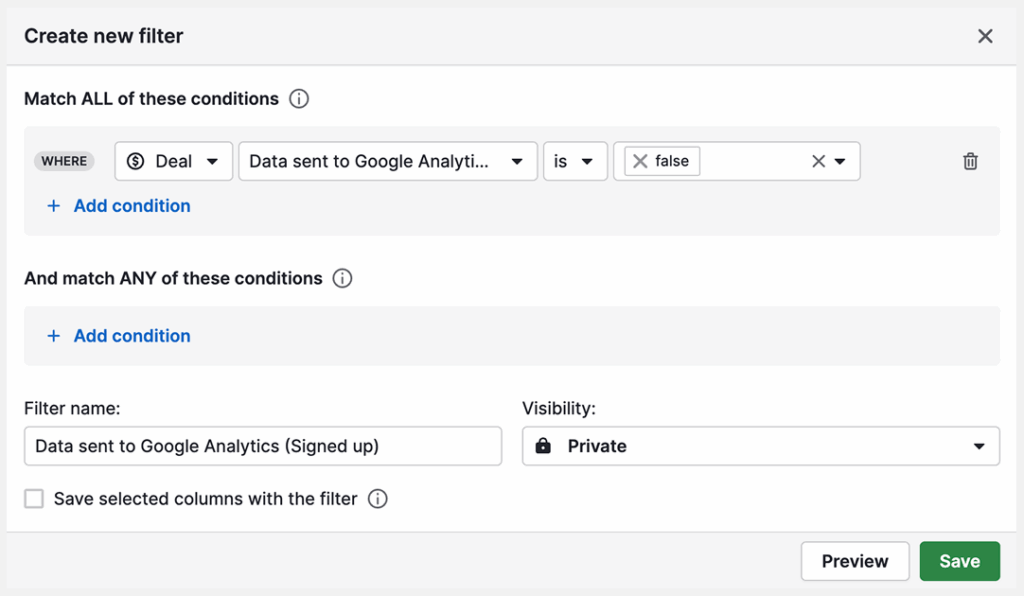
Click “Save”. When you select this filter for your pipeline, you won’t see any deals yet. That’s normal as you need to set up automations to populate these field values when deal stages change.
Create automations to update stage flags (fields)
Automations create workflows that update your deal fields automatically. You’ll use them to change field values when deals move between stages. Remember those true/false options you created? Automations will set these values based on stage changes.
Follow these steps to configure your automation:
Trigger:
- Event Trigger > Deal > Updated. Apply trigger.
Conditions:
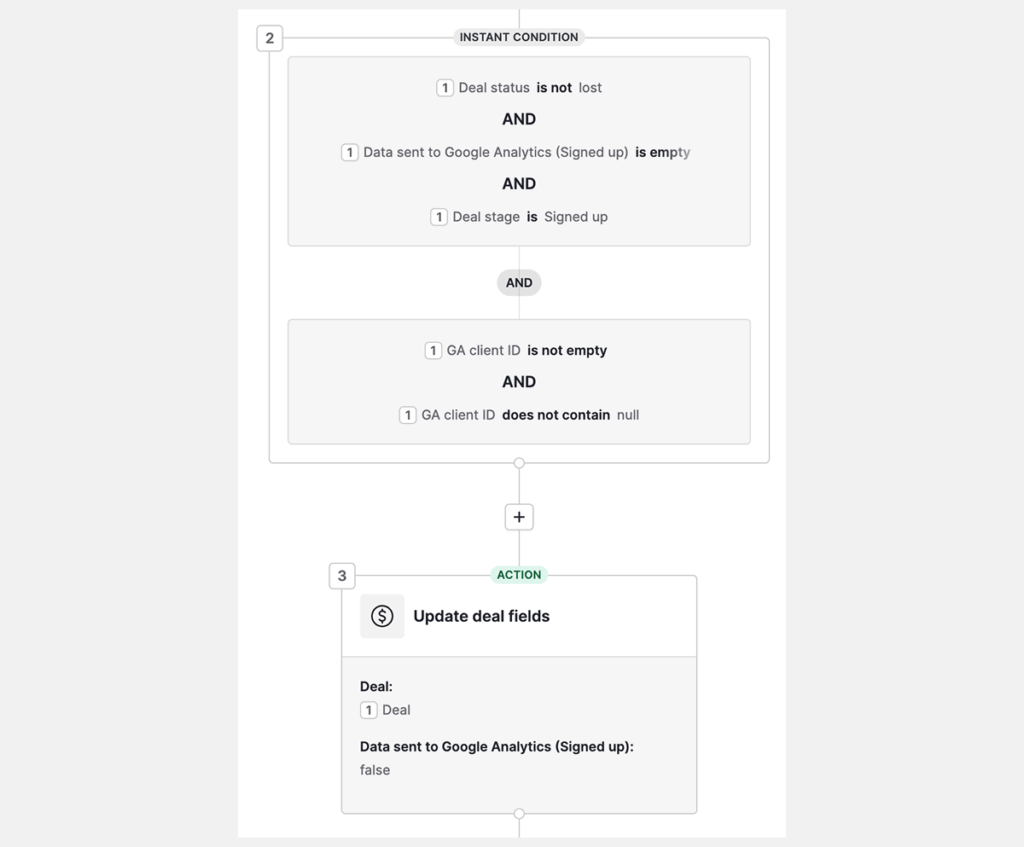
- Instant Condition > Deal stage is Signed up.
- Add custom condition > Data sent to Google Analytics (Signed up) is empty.
- Add custom condition > Deal status is not lost.
- Add new set (AND) > Add custom condition > GA Client ID is not empty (or Click ID is not empty when building for Google Ads).
Action:
- Action > Deal > Update deal fields.
- Select the field Data sent to Google Analytics (Signed up) and set its value to “false”.
Note: For automations targeting won deals, change “Deal status” to “is won” and remove the “Deal stage” condition under the Instant Condition block.
Click “Save” in the top right corner, and your Pipedrive automation is completed. The process seems complex initially, but you can duplicate this automation and modify it quickly for other stages.
Your completed automations page should look similar to this for all GA4 and Google Ads automations:

Connect Pipedrive to Google Analytics 4 with Zapier
Your Pipedrive setup is complete. You’ve created deal fields, automations, and filters. Now let’s connect everything through Zapier using those deal filters as triggers.
The process works like this: Deal stage changes → automation runs and sets deal field to false → deal filter finds new match → Zapier triggers using “Deal Matching Filter.” This sequence ensures clean processing without duplicate events in GA4 or Google Ads.
Send a regular event to GA4 (e.g. Signed up)

Create zap and add trigger
Create a new Zap and choose Pipedrive for the trigger. Select “Deal Matching Filter” for the trigger event. In the configuration step, choose the deal filter you created in Pipedrive.
Configure GA4
Add a new step and choose Google Analytics 4. Here’s where many people get stuck: GA4 offers two similar actions: “Create conversion event” and “Send measurement events.” Choose “Send measurement event.”
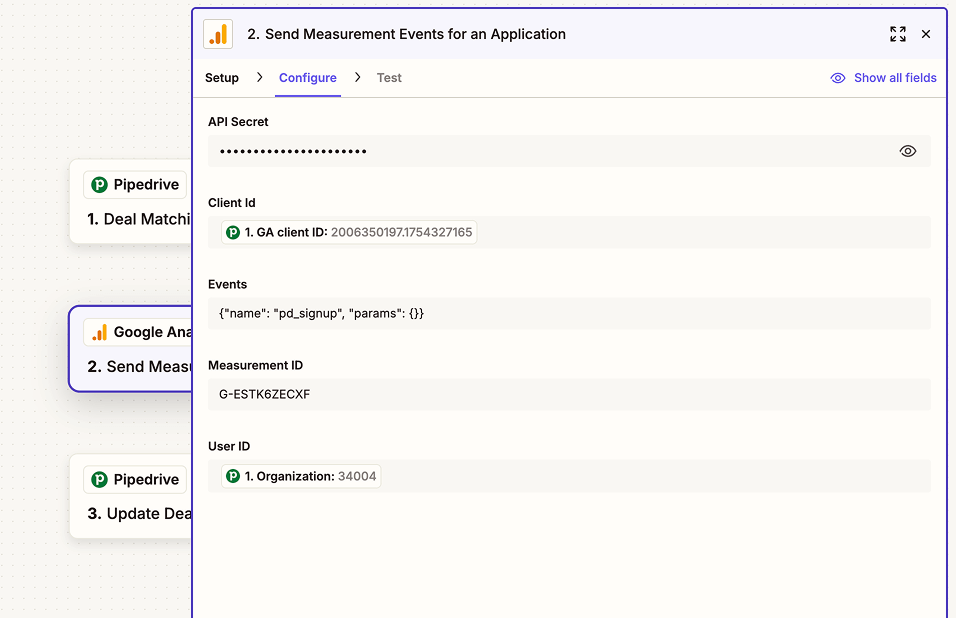
The Configure tab shows two fields: “API Secret” and “Measurement ID.” Copy these from your Google Analytics account:
- Go to Admin (bottom left corner) → Data streams → Click on your data stream
- Copy the Measurement ID from the top right and paste it in Zapier
- On the same GA4 page, click “Measurement Protocol API secrets” below
- Click Create, add “Zapier” as the nickname, then click Create
- Copy the API Secret value and paste it into Zapier’s API Secret field
For the Client ID field, select the GA Client ID field from Pipedrive.
For the Events field, add this JSON: {“name”: “pd_signup”, “params”: {}}. Name your event whatever you prefer, but use lowercase with underscores instead of spaces. Otherwise, events won’t appear in GA4.
Add final step
Choose Pipedrive as the app and select “Update Deal” for the action. In the Configure tab, choose your Deal ID value, then scroll down to find your previously created field name. Select the field corresponding to the deal stage you’re sending events for and set the value to “true”.
Send a purchase event with revenue to GA4
Regular events are useful, but attributing closed deal revenue to marketing sources is crucial for tracking channel effectiveness. Purchase events accomplish this goal.
Duplicate the Zap you just created since you’ll use similar steps.
Edit the “Deal Matching Filter” step and choose the Pipedrive filter for won deals. Set the Deal status field to “won.”
In the GA4 step, choose “API Request” for the action event.
The Configure tab now shows different fields than the Measurement Event action. Fill these fields:
HTTP Method: POST
URL: https://www.google-analytics.com/mp/collect
Query string parameters:
- measurement_id (same as in regular GA event)
- api_secret (same as in regular GA event)
Body
Replace the <<>> placeholders with values from your Pipedrive deal fields:
{
  "client_id": "<<Your Client ID field from Pipedrive>>",
  "events": [
    {
      "name": "purchase",
      "params": {
        "currency": "USD",
        "transaction_id": "<<Your Deal ID from Pipedrive>>",
        "value": "<<Your Deal Value from Pipedrive>>",
        "items": [
          {
            "item_id": "<<Identifier for the product sold>>",
            "item_name": "<<Name of the product sold>>",
            "currency": "USD",
            "discount": 0,
            "price": "<<Your Deal Value from Pipedrive>>",
            "quantity": 1
          }
        ]
      }
    }
  ]
}
For the final step, update the deal field corresponding to Deal Won and set its value to “true.”
Connect Pipedrive to Google Ads with Zapier
You’ll now integrate Pipedrive to Google Ads to send offline conversions. This section reuses the same deal filters and true/false stage flags you created earlier and the only change is swapping the GA4 step for a Google Ads step.
Send offline conversions to Google Ads
Since you’re replacing only the GA4 step with Google Ads, duplicate one of your GA4 Zaps.
Update the trigger to use the deal filter you created specifically for Google Ads.
Remove the GA4 step and replace it with the Google Ads app.
Choose “Send Offline Conversion” for the Action event. In the Configure tab, select your GCLID field from Pipedrive.
Update the final “Update Deal” step by finding the corresponding deal field and setting the value to true.
Wrap-up
You have completed the setup to automatically send conversion events when deals progress through your pipeline. You are now able to setup custom audiences in Google Analytics 4, see revenue attribution across channels and help optimize your Google Ads targeting.
I help businesses solve complex marketing attribution challenges. If you need assistance implementing GA4 tracking, setting up conversion pipelines, or capturing the Client IDs and GCLIDs mentioned in this guide, contact me at sessionframe.com